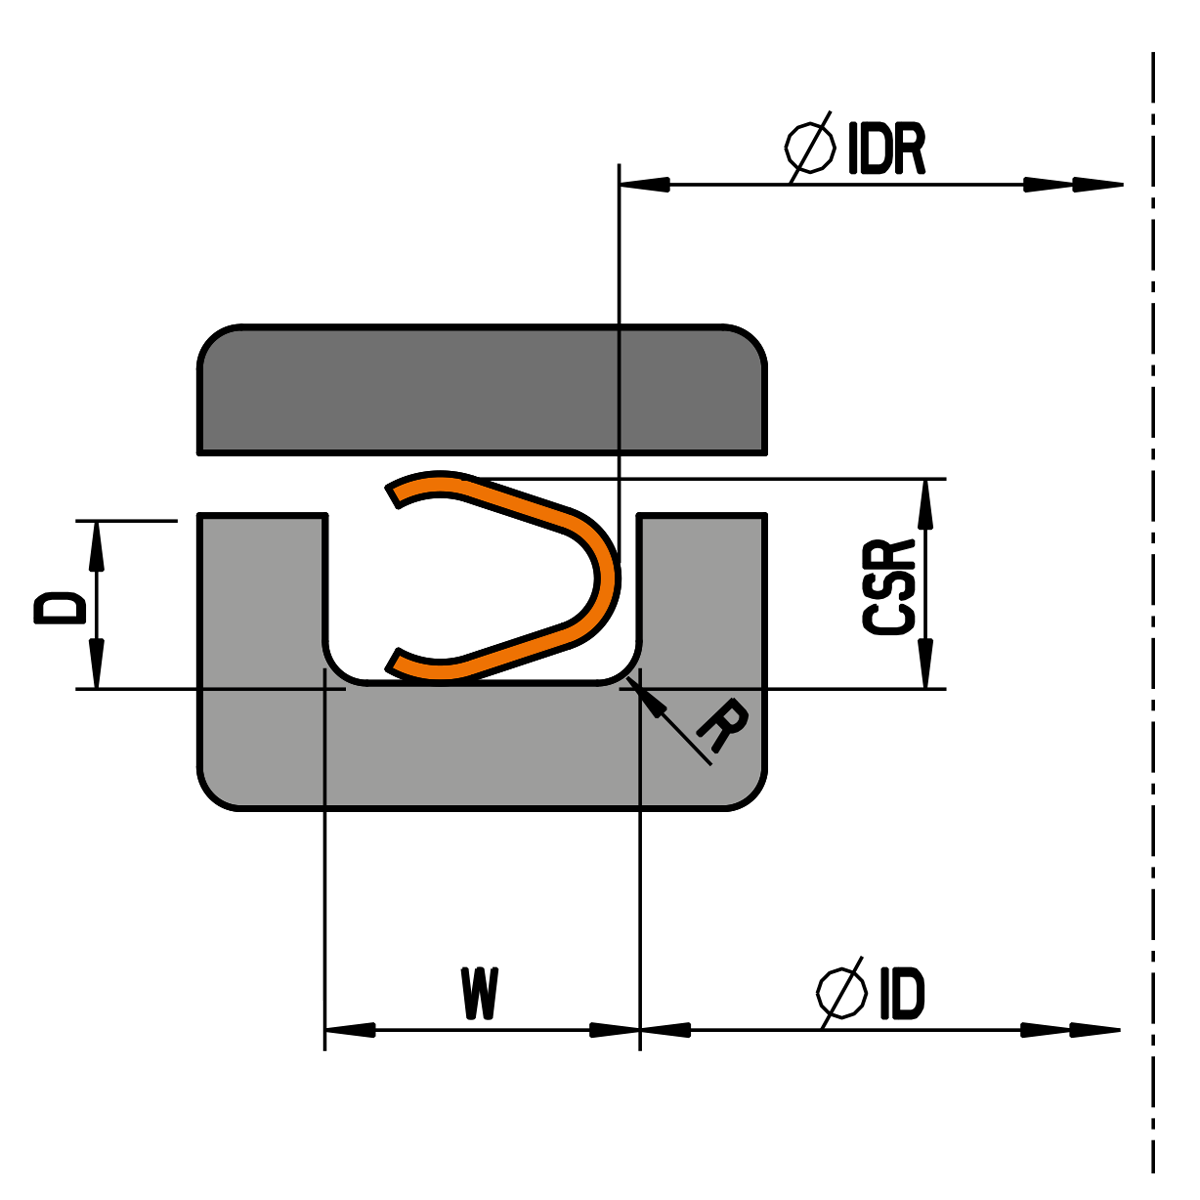
MUO (Metal U-Ring for external pressure application)
External pressure application

For external pressure applications the inner diameter of the ring IDR is calculated as follows:
IDR = ID + Z
| CSR | Nominal cross-section: cross-sectional dimension (without coating) e.g. similar to the cord thickness of elastomer O-rings |
|---|---|
| Code | Performance Index: shows characteristics of the ring (e.g. pressing load, springback) |
| D | Groove depth: axial design dimension to which the ring is pressed from the original cross-section CSR. |
| F | Pressing load: the mentioned guide values refer to 1mm seal length. To obtain the total load of the seal for the design of the construction, this value must be multiplied by the circumferential length of the seal. |
| ID | Inner diameter of the groove: reference dimension for external pressure applications. |
| IDR min. | Inner diameter of the ring: The inside diameter of the ring is freely selectable from the mentioned minimum dimension IDR min. and is at the same time the corresponding dimension to the inner diameter of the groove. |
| Pt | coating thickness |
| R | Radius: Design dimension that improves the support of the ring under pressure |
| SB | Springback: maximum possible measure by which the ring can spring back elastically overall. Important value in connection with possible flange gaps. |
| Wmin | groove width: radial design minimum dimension. The specified minimum dimension Wmin. must not be undercut. |
| Wt | Wall thickness: sheet thickness of the ring. |
| Z | diametric clearance between ring and groove. |
The following ordering example describes a metal U-Ring for external pressure application Typ MUO in
7
Material Inconel 718
4,78
Cross section 4,78 mm
w
with wall thickness 0,51 mm
0190,30
Ring inner diameter IDR 190,30mm incl. coating
(suitable for groove inner diameter ID 190,00mm)
(suitable for groove inner diameter ID 190,00mm)
4
solution annealed and precipitation hardened
S
Silver coating
L
0.01 - 0.03 mm thick
MUO
-
7
-
4,78
w
-
0190,30
-
4
S
L
| Metal O-Ring MUO | Installation space | Performance | ||||||||
|---|---|---|---|---|---|---|---|---|---|---|
| Nominal cross-section |
Performance index |
Wall thickness | Inner diameter ring |
diametrical clearance |
Groove depth | Groove width | Radius | Pressing load (Guide values) |
Springback (Guide values) |
|
| CSR mm |
Code | Wt mm |
Ø IDR min. mm |
Z mm |
D mm |
Tol. mm |
W min. mm |
R max. mm |
F ca. N/mm |
SB ca. mm |
| 2,39 | w | 0,25 | 30 | 0,15 | 1,90 | +0,10 | 3,20 | 0,50 | 25 | 0,28 |
| 3,18 | w | 0,38 | 45 | 0,20 | 2,55 | +0,10 | 4,20 | 0,75 | 30 | 0,35 |
| 3,96 | w | 0,41 | 65 | 0,25 | 3,20 | +0,10 | 5,20 | 1,25 | 25 | 0,46 |
| 4,78 | w | 0,51 | 70 | 0,30 | 3,85 | +0,15 | 6,40 | 1,30 | 25 | 0,70 |
| 5,60 | w | 0,51 | 80 | 0,35 | 4,50 | +0,15 | 7,30 | 1,30 | 20 | 0,80 |
| 6,35 | w | 0,64 | 120 | 0,40 | 5,05 | +0,20 | 8,50 | 1,50 | 30 | 0,85 |
| 9,53 | w | 0,97 | 300 | 0,58 | 7,70 | +0,30 | 12,70 | 1,50 | 45 | 0,90 |
| 12,70 | w | 1,27 | 600 | 1,77 | 10,20 | +0,30 | 16,50 | 1,50 | 60 | 1,20 |
Mentioned performance guide values are valid for seals made from Inconel 718 work hardened.
Other sizes not listed in table available on request.
Ring material
| Ring material | Code | Material no. |
|---|---|---|
| Inconel 718 | 7 | 2.4668 |
Other materials on request.
Heat treatment
| Heat treatment | Code | Description |
|---|---|---|
| HT 1 | 1 | work hardened |
| HT 2 | 2 | age hardened |
| HT 3 | 3 | Solution annealing + precipitation hardened SC |
| HT 4 | 4 | Solution annealing + precipitation hardened Std |
| HT 5 | 5 | Heat treatment NACE MR 0175 |
Other treatments on request.
Coating
| Coating | Code | max. temperature |
|---|---|---|
| Tin | Z | 200°C |
| PTFE | P | 290°C |
| Silver | S | 430°C (650°C*) |
| Copper | C | 930°C |
| Gold | G | 930°C |
| Nickel | N | 1200°C |
| without | O | – |
* Only valid for non-oxidizing media.
Other materials on request.
Coating thickness
| Coating thickness Pt | Code |
|---|---|
| 0,01 - 0,03 mm | L |
| 0,03 - 0,05 mm | M |
| 0,05 - 0,07 mm | H |
Other coating thicknesses on request.


